On this page I will try to answer your sourdough starter frequently asked questions. This is by no means comprehensive list and I will be adding to it as I get more questions from you.
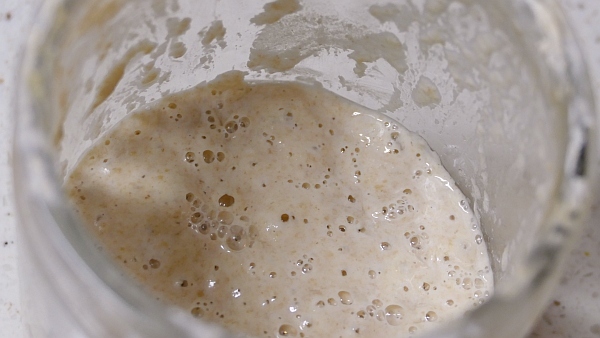
What is a Sourdough Starter?
A sourdough starter is a mixture of flour and water which has been fermented. The lactic acid bacteria and yeasts (occurring naturally on the outside of the grain), along with activated enzymes, begin the process of fermentation.
The by product of fermentation is Co2 gas which is used to leaven baked goods. So you have a bunch of microorganisms farting, which produce enough gas to make dough rise.
How to Make a Sourdough Starter
A sourdough starter is made by combining flour with water and allowing the mixture to ferment. Once the water and flour are combined, the microorganisms present in the flour activate and then begin to establish themselves. It is a known process with expected outcomes over the two weeks it takes for the starter to mature. In the beginning a starter is not acidic, so the microorganisms that favor a non acidic environment try to gain the upper hand and establish themselves. The starter needs to be fed and cared for. The microorganisms need to stay healthy.
A Bad Smell
During this stage a starter can foam up and will often smell terrible or even horrible. At this point many new bakers will throw out their new starter not realizing that this is normal and happens as the microorganisms fight to establish dominance.
Once the starter becomes acidic enough (sometimes helped by using some acidic type of juice), then the desired organisms (Lactic Acid Bacteria and yeasts) take over and begin to establish themselves as the starter matures. You do not need to use juice when making a new starter but it can help acidify the environment of the starter enough to help the desired microorganisms take over quicker (Debra Wink in The Pineapple Juice Solution).
It’s Not Ready
Sometimes a baker thinks that if a starter is active within the first three days it means the starter is ready to use, but it is not ready, it’s just the microorganisms fighting to establish themselves. They might try and bake with the new two or three day old starter and find that their bread is pretty flat. Then they give up, thinking they are a failure. However, the starter just needs time to mature and build strength. It can take 10-14 days or longer for a sourdough starter to be strong enough to leaven bread. So be patient and keep discarding and feeding your new starter.
Live Video – Day by Day How to Make Your Own Sourdough Starter
In 2018 did a live video series on how to make your own sourdough starter day by day through 14 days. The series takes you through what to do and expect each day, how to feed and care for your starter, how to dry and store your starter and also how to test it. I also show you how to use the discard to make waffles on day 7 and how to bake up a test loaf on day 12 ( to see if your starter is strong enough to bake bread with).
To learn more about how to make your own sourdough starter day by day, starting with day one, begin here with this video playlist. It was taped live and I answered live questions during the series from the event followers:
How to Feed Your Sourdough Starter
Feeding a sourdough starter depends upon whether you are feeding it to maintain it, to bake with it or to revive it. The following applies AFTER your starter is stable and has passed it’s 14 day birthday.
Measuring by Weight.
No, the short answer is you don’t have to measure by weight. You can just throw flour and water together and wait for it to ferment. You can measure the way they used to, by volume (1 cup of this and 1 cup of that). However, if you want to speak the language other bakers speak, you will not only use a kitchen scale, you will learn to use metric.
Don’t give me any excuses, because I’m a dinosaur at 61 and am a US citizen taught to use standard and volume measures. However, it is not the language other bakers speak, they use metric and baker’s percent.
Metric is easier and more accurate. After all there are about 28 grams in 1 ounce (28.349).
That’s 28 times more accurate than when you’re measuring with standard measurement. It’s rare to find a standard scale that will be more accurate than 1 oz.
However the biggest deal breaker might be that most serious baking formulas and teachers use metric. Metric and volume are not very compatible. Standard measurements don’t always easily convert to metric and back.
The best way to use metric is to purchase a kitchen scale that has metric measurements and follow the formulas/recipes the way they are written without converting them to standard. And only use your cup measures for scooping.
Feed Your Starter Only Flour and Water (and maybe juice).
Flour:
You can use almost any flour as long as it’s good fresh flour and not old moldy flour. Since there are more microorganisms present in whole grain flour than in a plain white flour, it makes sense to use a whole grain flour to make and feed your starter when you first start out.
Whole Grains:
Whole grains ferment and mold more quickly than white flour, this is especially true of rye flour.
Often bakers will make a compromise by using half whole grain flour and half white flour to feed their starter. Some bakers like using and keeping only a rye or whole grains starter with no white flour in it at all. It’s really up to you. In the video series above, I use a mixture of half whole wheat and half white flour.
Note that a starter using all whole grain flour will be stiffer than a white flour starter even though they might both be 100% hydration. That is because whole grains absorb more liquid (rye flour especially) than white flour.
Also note that a higher protein flour like a bread flour, will also absorb more water than an all purpose lower protein flour. So you can expect your starter to feel, look and smell different if you use different flour types.
Don’t feed your starter, milk, sugar, eggs, leftover dough etc. You are just asking for trouble. If you want to make a sweet starter or a milk starter, remove some of your starter from it’s container and begin a separate starter. That way you always have your original starter unspoiled.
You can experiment with your starter food ( using only grain flour). You can try feeding it different types of flour, although once it’s used to a certain types of flour, it might balk at changes to it’s diet. Sometimes changing the diet is easier if you do it small incremental amounts at a time. In this way you could have a whole wheat starter a rye starter and maybe different hydration starters. Again, put some of your original starter into a new container to try one of these ideas.
Try using a scalded flour for food. The starch is liberated by the scalding so it’s a bit sweeter. A scalded flour is similar to a roux. Mix a small amount flour and water together to make a mixture and simmer it for a minute. Then cool before using.
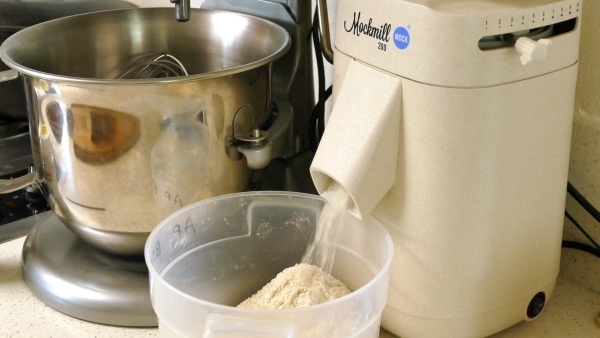
If you can obtain whole grains and grind your own flour you’ll have the freshest flour and the best tasting bread.
Water:
Water is as important as flour. Poor water quality, water high in chemicals, water that is very acidic or alkaline can affect your sourdough starter. Some bakers have no problems with tap water, other bakers will notice a slow decline in health and then a lack of vigor in their starter if they use tap water. It depends upon your local tap water quality.
To dissipate the chlorine from your water, you can fill a large container with water from the tap and allow it to set out, lightly covered, 24-48 hours until you see the bubbles on the sides of the container dissipate. You can also boil and cool your water, which will help somewhat. Some chemicals have to be filtered to remove though. So if you still have problems keeping your starter healthy try using filtered water or change your water source.
You Can Use Juice To Jump Start Your Starter.
In the first four days of your starter’s life, it will not be acidic enough to discourage undesirable microorganisms. It’s one reason there can be extra activity or terrible smells during the first several days. The microorganisms are fighting for dominance and they don’t realize that as the starter becomes more acidic, the ones that cannot live in acidic conditions will die off, leaving the good ones to thrive. You can read more about this here: The Pineapple Juice Solution by Debra Wink.
If you want to jump start the process, try mixing 1/2 water and 1/2 juice for the liquid amounts when feeding your starter during the first four days. After that it won’t be necessary as the starter should be acidic enough on it’s own.
Discarding – Why it’s Done.
When you first make a sourdough starter, you will be told to discard some of the starter and then feed it. You might wonder why do I have to discard any of your starter, why can’t you just keep feeding it?
Well a sourdough starter is filled with billions of microorganisms (yeasts/bacteria) that need to be fed as they multiply quickly. If you don’t discard or use up some of your starter, then you will be feeding more and more microorganisms less and less food by ratio. That means there are more microorganisms putting waste into their environment and not getting enough food. The only way to keep your starter healthy is by having less microorganisms which all get enough food.
So if you are not using your starter, discard or use some of the starter to bake with, then feed the small amount of starter left over, so it can be healthy when you need it for the next bake. You want a nice container filled with bubbly fermentation (Co2 gasses) caused by happy microorganisms.
You can keep small amounts of your starter when it’s in maintenance mode (not being used to bake with). Then you can feed it more (so you have enough for your formula/recipe) in the days/hours before you mix up dough.
When Do You Need to Feed Your Starter?
When you first start your sourdough starter, you don’t need to feed it until you notice it’s got good fermentation going on (It might take two or three days). Before that, you would just be diluting the yeasts and bacteria that you are trying to culture.
Once it’s fermenting though, you will need to discard and feed about every 12 hours (in cool kitchens some like to feed every 24 hours, depends upon whether that will keep your starter healthy or not).
After your starter is six or more days old, it will begin to tell you when it needs food by the smell. A starter will smell sharp and vinegary when it’s hungry. If the starter smells very strong or like acetone, it’s ravenous and needs to be fed more often or more food at meal time.
A warm starter needs to be fed more often. A cool one less often.
You would generally feed your starter 6-10 hours before using it for mixing dough (depending upon the temperature and starter activity). But some bakers will feed it four hours beforehand using a larger amount of starter to food ratio and perhaps it’s also warm in the kitchen.
General ideas for helping your starter last longer between feedings.
Slowing Down Your Starter:
Feed your starter more food. Feeding your starter a higher ratio of food to starter will help it last longer between feedings. That means you need to discard most of your starter while keeping a small amount on the bottom of the container. Then you feed it a higher ratio of food. You can select your ratio but keep in mind the higher the ratio of food to starter, then longer it will last.
So for instance a 1:1:1 ratio (like maybe 50 g starter: 50g flour: 50g water) will ferment faster at a given temperature than a 1:2:2 ratio ( like for instance 30g starter: 60g flour: 60g water). If you select a really high ratio like 1:5:5 your starter will last much longer (perhaps 20g starter: 100g flour: 100g water).
This holds true whether you are keeping your starter cold (in the fridge) or at room temperature or in a very warm area. If you go on vacation feed it a very high ratio of food and it will keep happy until you return.
Don’t Let Your Starter Get Too Warm
With every degree increase of temperature the fermentation rate of your starter will increase (this is true for dough as well). You can use cold or even ice water for feeding your starter or mixing your dough. You can keep your flour in the fridge. You can store your starter in the fridge (once it is mature, it’s better for a new starter to stay at room temperature while it is maturing).
So if your starter is fermenting too quickly, cool it down by finding a place in your home that is not too warm (between 70F/21C and 76F/24C is ideal but even cooler is fine for a sourdough starter. Once it becomes too warm, you need to feed more often and higher ratios of food. So don’t put your starter in a warm oven or warm proofing box unless it’s sluggish or your trying to revive it.
Use a pinch of Salt
If you are in a hot climate and having a difficult time with your starter fermenting too quickly, add a small pinch of salt during feeding, it will help control the fermentation.
What Does Hydration Mean for a Sourdough Starter?
In baking hydration of dough simply means how much water/liquid there is as a ratio to the flour weight.
A Liquid Starter – 100% Hydration – The Standard
The most common hydration for a starter is 100% hydration which means Flour= 100% and Water = 100%
(100% (baker’s percent) is always the weight of the flour). So that might look like 60g of water and 60g of flour. It can also be 35g water and 35 g flour or 80g:80g. Most formulas and Recipes will use a 100% starter or tell you how to make a different hydration starter using a 100% starter.
A 100% hydration starter (the most commonly used) means there is 100% weight of water to flour. For instance 100 grams of flour and 100 grams of water means the starter is at 100% hydration. That means that when you match the exact weight of flour with water it will be 100% hydration so 80g and 80g is 100% and 35g and 35g is 100%.
When you have a 100% starter, if you continue to feed it equal weight of water and flour, it will stay at 100%. So 22 grams of 100% hydration starter plus 85g water and 85grams flour is still 100% starter.
Other Common Hydration for Starters:
A Stiffer Starter Will Last Longer Than a More Liquid Starter.
Sourdough starters are kept at different hydrations (amount of liquid to flour).
Stiff Starters:
A stiff starter can have many different names, motherdough, Pasta Madre, Lievito Madre etc. These are starters that are very low hydration. They can be 80, 60, 50, 40% hydration even 30% hydration is used. The lower hydration the starter, the harder it is to mix by hand and the drier it is. With low water activity, the fermentation slows way down and it is able to last longer between feedings. It also ends up being a concentrated source of microorganisms. You will find most stiff starters are kept at 50% hydration.
A dry or stiff starter might be at 50 or 60% hydration. Which means for every 100 grams of flour there is either 50 or 60 grams of water.
A Very Liquid Starter – 166% Hydration – Old Timers
In the old days, when kitchen scales were scarce, many home bakers used volume measurements (cups, quarts, spoons etc). They would feed their sourdough starter using a ratio of 1:1 by volume instead of by weight. It’s a huge difference.
One cup of flour and one cup of water end up making around 166% hydration starter which is so liquid that the bubbles escape and so the starter doesn’t look very active even when it is. A very liquid (wet) starter will ferment more quickly.
Since water is around twice as heavy as flour when using volume measurements, if you don’t have a scale and want to approximate a 100% starter, then use about half the amount of water by volume as flour (for instance 1/2 cup flour: 1/4 cup water).
Discovering Sourdough – The E-Book – Uses the very liquid 166% sourdough starter:
This book has metric, volume and standard weights for all of the formulas/recipes.

In my early days of baking with sourdough(over 15 years go), I did not have a scale (weird I know!) I based my recipes from this very liquid starter, which is actually fun to play around with. I wrote a four volume book (400 pages) filled with sourdough know how and formulas using this very liquid stater. You can find this four volume e-book here:
Discovering Sourdough (four files together, 400 pages total) – Pdf version on Etsy.
Discovering Sourdough (4 separate volumes, 400 pages total) – Kindle version on Amazon
The Warmer Your Temperature, the Faster Your Starter Will Ferment.
In hot climates, it can be very difficult to starter and maintain a sourdough starter. Fermentation speeds up as the temperature increases. If you try to keep your starter very warm to speed it up on purpose, you will find that it needs more food more often and sometimes, especially for a new starter, it can become unhealthy.
Warmer is not Always Better:
Warmer temperatures can encourage bad bacteria to take over and in a new starter that isn’t mature, that can be an issue. A mature starter has an environment that is healthy for the microorganisms. It takes care of itself and it has been hypothesized that it produces antibiotics to protect itself from bacteria.
Keep your starter in a cool to mid range temperature (if you can) to keep it healthy and not have to feed it so often.
Cool from refrigeration 39F/3C all the way to maybe 76F/24C (Above those temperature can be okay for bread dough -optimum range up into the 80’sF/26’sC) but lower temperatures are better for sourdough starters.
Feeding Your Starter for Maintenance:
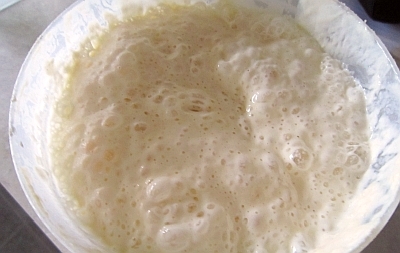
To maintain a starter kept at room temperature (between 70-75F/21-23C) you need to feed around every 12 hours.
Keep small amounts and feed small amounts when maintaining. Suggestions might be keep 20 g starter and feed 50g of flour and 50 g of water. Or you can opt for more at 30g starter and 60g flour and 60 water. You can do higher ratios of food like 10g starter and 50g flour: 50g water.
The ratios I have suggested are all different and you will use different ratios depending upon what you plan to use your starter for.
If you plan to feed it and not use it for some time, you would use a higher ratio of food to starter, like maybe 30g starter: 100g of flour: 100 water.
To feed your starter kept in the refrigerator. Take it out and use it or feed it at least once a week. If you’ve neglected it and it has been a while in the fridge, then you should take it out, leave it at room temperature, and feed it twice a day until it gets bubbly and active again before using it.
Your starter can survive being neglected and unfed for months, but it doesn’t mean that it is in a condition to make great bread. If you’ve neglected your starter, begin refeeding it more often until it’s happy again before using it.
Sluggish Starter – What to Do
Sometimes your once active starter might become sluggish, especially if kept in the refrigerator all of the time. Try keeping it at room temperature for several days and feed it every 12 hours. Within a few days it should perk up and become active again. You can also try a bit of rye flour in your white starter to perk it up. Rye flour is full of microorganisms and can perk up a starter.
You can also try discarding most of the starter and feeding it higher ratios for several feedings.
Feeding Your Starter to Use in a Formula:
If you plan to use it tomorrow, you would keep more starter and feed enough to use in your dough and have some left over for feeding and keeping.
Mixing Dough in the Afternoon:
If you need 300 grams of starter for your dough mixing in the afternoon, then the night before , you might want to feed your starter a small amount say 30g:60g:60g and then the next morning you can feed the now active 150g starter with 100g flour and 100g water which would give you 350g active starter for the afternoon.
If it’s warm in your area, you would use less starter and feed more food for the above scenario.
First feeding – night before: 10g starter: 30g flour:30g water.
Next morning: 70 g starter 140g flour: 140g water.
Note that with that type of feeding you don’t need to discard (except maybe with your first feeding of the starter)
Mixing Dough in the Morning:
If you want to mix dough first thing early in the morning then feed your starter the night before and feed it enough so that there is enough for your formula and some left over to feed again. After you feed it, leave it at room temperature so it’s actually ready the next morning. Also make sure not to use too high a ratio of starter to food if you are leaving it out overnight. That way most of the gluten in the starter will be strong.
Maybe: 60g of starter: 140g flour: 140 g water OR 30g starter 140g water: 140 g flour if the kitchen was very warm (let’s say you needed 280g of starter for your dough).
If you just feed your starter the amount needed in the formula, you will always have enough left over to feed again.
Note: larger amounts of starter to food ratio if you need it sooner. Larger amounts of food to starter ratio if you need it later or if it’s warmer.
Containers for Your Sourdough Starter:
You can use glass, food grade plastic, food grade pottery etc. Do not use reactive metal spoons or reactive metal containers with sourdough. The acids in the sourdough will react with the metal.
Stainless steel is fine to use (think of all the stainless in bakeries). If you use a glass container make sure it’s heavy and won’t chip easily. I’ve had several baker’s over the years who tossed their starter because they chipped the edge of the glass container it was kept in or the container broke.
I mostly use Cambro food containers to keep my sourdough in and also for holding my dough.
Sealed Lid or Not?
A sealed lid on your container will help keep dirt and bugs out (especially fruit flies) and helps the starter not dry out. The sourdough starter is anaerobic and does not need oxygen to survive. However, it does like oxygen and benefits from a nice good stirring when you feed it.
Make sure to use a large enough container so it has plenty of headroom for the gasses. I use a 2 liter container but only keep small amounts of sourdough in it. That way the gas has plenty of room and doesn’t build up pressure. It also gives me enough room to double or triple the amount I need without changing containers. See Cambro container below.
You can use a cloth covered container if you wish, just make sure fruit flies cannot gain entrance and if you notice your starter has a dried skin on top, don’t be surprised (just peel it off and continue feeding). By drying on the top, it is actually creating it’s own lid!
Believe it or not a sealed lid also makes it easier to keep your starter container clean.
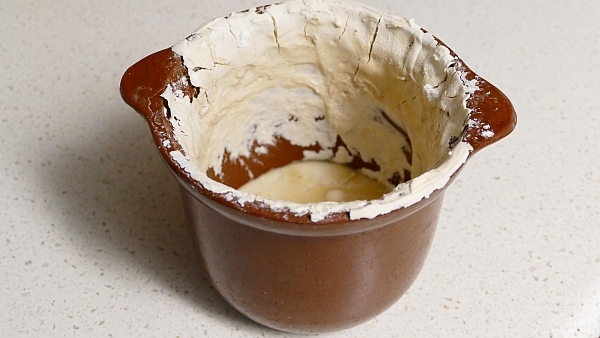
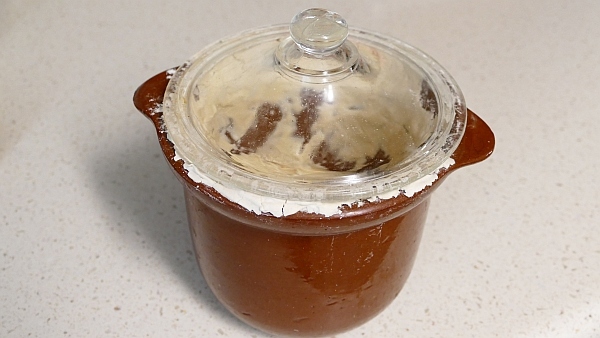
With my starter videos I used a pottery container with a loose fitting glass lid. It looked nice so I thought it would be great to use for the videos. However as time went by (I got lazy about putting the starter back into my Cambro container), it built up a huge layer of dried starter that was thick like concrete and hard to remove.
It was very hard to clean it. I eventually put the starter back into my Cambro container after Karl the Librarian came for a visit and was shocked to see the encrusted messy container. I had always kept my containers relatively clean which is easy to do with a sealed lid container. I advocate keeping your container clean, really Karl!!! Karl is a terrific baker and friend and takes care of the only sourdough library in the world. Visit him here: Quest for Sourdough.
The following container is hard to clean. It has sloping sides and a loose fitting lid.
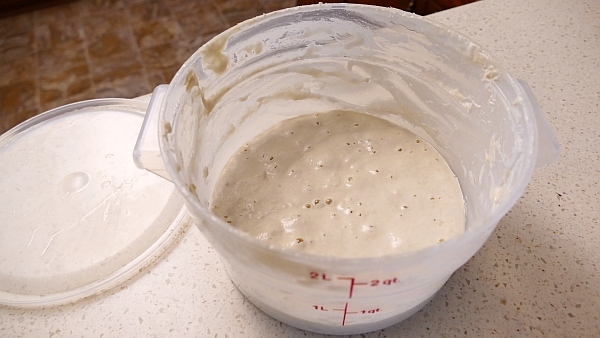
The above photo is how I usually keep my sourdough starter. This 2 liter Cambro container has a nice tightly fitting lid and straight sides, which make it easier to clean.
The starter doesn’t dry out in this container and the sides are easy to scrape. It’s a two liter size which is nice for keeping my starter with plenty of headroom for gasses and for making more starter when necessary.
Cleaning Your Sourdough Starter Container.
I know we can sometimes get lazy about it. I guess Karl caught me out. But it is important to keep your starter container clean. If the sides build up too much and dry out like the first container pictured above, it’s even harder to clean and mold can grown on the sides.
Clean your starter container by taking some of the starter out and reserving it in a bowl. Then take your container and scrape out and discard all of the excess starter in the container and on the sides.
If your container has straight sides try using a butter knife to scrape the sides. Then using hot water, scrub it with a kitchen brush until it is clean. Don’t use soap, don’t use bleach. Just use hot water. Clean the lid as well. Then replace the starter you have reserved in the bowl and begin to feed your starter again.
A container with curved sides is very hard to clean.
Testing Your Sourdough Starter:
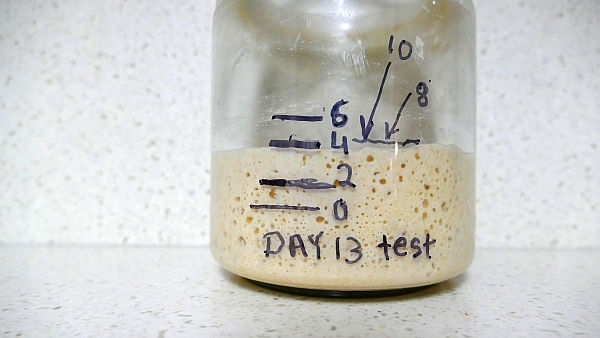
In the video series at the top of this page, you will see how to do a test of your starter. It’s not only important to know if your starter is strong enough for baking bread with but it ‘s also a good idea to know what proofing time it has. Sourdough starters generally fall between 6-8 hours proofing starters with six being average. That means most starters will peak at around 6 hours before starting to fall back.
There’s nothing wrong with having a short proofing starter or a very long proofing one. However, you might have to adjust your timing when you follow other people’s formulas.
Note that a young starter may start with a longer proofing time, say 10 hours, and as it matures, it could end up being a 6-8 hour proofing starter. So you might want to test it few more weeks after your initial test.
When is My New Starter Ready to Use?
A new starter generally takes about two weeks to fully mature and stabilize. It might be ready sooner or might be ready later. It’s advisable not to use a new starter’s discard until after the starter begins to smell yeasty and fruity. That might be day 6 or 7. At that time you can begin to make waffles, biscuits, pancakes, cakes, muffins etc. These are baked goods that don’t rely on the starter’s strength. By day ten to twelve, if you’ve done your starter test and your starter is doubling, tripling or more, then it’s ready to start baking bread with.
How long after Feeding Should I use My Starter?
It’s good to use your starter on it’s upswing. So use it as it approaches it’s peak. Some baker’s like to use only a young starter (maybe 4 hours past feeding). Other’s like to use it close to peak at around six to eight hours. It will actually work in a wide range around it’s peak.
You can still use it ten hours after feeding as long as it’s been kept somewhat cool. You don’t want to use a starter that’s past it’s peak by a lot, is smelling sharp and vinegary and is obviously fallen all the way back, plus might have really broken down, gluey gluten. At that point, discard, feed and plan to mix your dough later.
Why Isn’t My Starter Doubling?
If your starter is new, it might just need more time to mature (often the reason).
It might be a bit too cool. Being cool won’t hurt it but it will slow it down.
You might have old flour. Check your flour bag to see the date on it. Realize that most flour is dated a year or two in advance.
Your water source might need to be changed.
You may have neglected it for too long. If you’ve neglected your starter, it may need several days feeding at twice a day to bounce back.
You may have changed flour types and your starter is balking. Give it time to get used to new food.
It might have gotten too hot. If you’ve kept your starter in your oven with the light on or the pilot light on, it might have gotten too hot. Keep it at room temperature for a few days and keep feeding it, see if it will respond.
You might be keeping a very wet starter. If you have a very liquid starter, the bubbles will escape and although your starter might be vigorous, it won’t double.
You may need to feed it more often for a few days to increase activity (try twice a day at room temperature).
What is the Liquid on the Top of My Starter?
The liquid that pools at the top of your starter is called hooch. In the old days when a starter was very fermented, the hooch was even used as an alcoholic drink (that’s desperation!). The hooch can be different colors depending upon the color of your flour or how neglected your starter is. It is very dark with a neglected starter and varying colors for different flour types.
If your starter is well fed and maintained (after it’s mature) and you are keeping a 100% starter, then you won’t notice it very often, if at all. It usually happens after being stored for a long time, the solution of flour and water will separate and the starter needs to be fed.
Hooch is harmless. Just stir it back in or pour it off. Then discard most of your stater and begin to feed it again.
What To Do If My Sourdough is Dried Out on Top?
If you find your sourdough starter has a thick layer of dried sourdough on the top, then simply peel off the dried layer, toss it and then discard and feed your starter as usual. The dried layer won’t hurt anything, it is basically sealing itself off.
Is My Starter Dead?
It could be. However starters are very hardy and can put up with a lot of neglect and abuse. If your starter has a slime mold on the top (a slimy layer setting on the top) or has turned a weird color like pink or orange, don’t take a chance and toss it.
If you don’t have a properly lidded container, fruit flies can lay eggs and you can end up with worms in your starter. If your starter smells really awful, and it’s not a new three-four day old starter, but an established one, check for fruit fly worms/larvae. If that happens, scrape off a bit of the dry starter from the lid and begin a new starter or start over from scratch.
Remember a bad smell is normal for a new starter around day 3-5.
If you see wriggling creatures in it, toss it and start over. Fruit flies can lay their larvae in a sourdough starter and you will end up with tiny worms. Your starter will usually smell terrible if this happens. Use an airtight lid or a cloth to keep out fruit flies.
If your starter has a dried skin on top it is probably still good. If your lid is not airtight, the very top of the starter can dry out, forming a skin, which is really like an almost airtight lid 🙂
Just scrape off the dried top, discard and feed as usual. Then you might want to get a better fitting lid.
Mold, Slime and Kham Yeast
Mold.
If your starter has mold growing on the top, not to worry, you can still save it. Discard all of the starter from the top of the container. Then scoop out a small amount of starter from the bottom of the container. Place it into a clean container and continue your feeding schedule. Starter fed often usually won’t mold.
Slime.
A slippery, slimy layer (like a thick snot) on the top of your starter is usually a slime mold. It can be clear or be various colors. If it is pink or orange or a really off color, toss your starter and begin over. If the slime mold is clear or about the same color as flour, then follow the above procedure for getting rid of mold. If you follow the procedure and the slime comes back again, then toss the starter and begin over with a new starter. If your new starter grows slime too, then take a good look at your water source or your flour.
Kham Yeast.
Many types of fermented foods get Kham yeast and it is harmless. It looks downy, soft, powdery white and often will wrinkle or sit on the top of the starter. Follow the procedure for getting rid of mold above to get rid of it.
Kombucha contamination.
If you have Kombucha in your kitchen, it might cross contaminate your sourdough starter. You will notice a rubbery layer on the top of your starer that is pale or whitish. Follow the procedure above for getting rid of mold and keep your starter far away from your Kombucha.
How to Revive a Sick or Neglected Starter.
If you want to try and revive a starter that is sluggish, neglected or sickly then do as follows. Get a new container. Scoop up some of the starter from the bottom of the old jar and put it into the new container. Then begin to feed it again as if it was a new starter. Feed it twice a day with a good quality flour and water and keep it at room temperature. Discard and feed twice each day for several days until your starter is bubbling away and healthy again.
Reactivate a Dry Starter:
To reactivate a dry starter, to 80 grams of water add a small amount of the dry starter, you don’t need much, a spoonful will work. Let the starter soften a bit and stir. Then add 80 grams of flour. Let the mixture set (in a sealed container) until it starts to bubble. Then once it’s fermenting nicely, begin to discard and feed as mentioned above.
The 80 grams of water amount isn’t magical, it can be any small amount of water with the same amount of flour used for feeding to bring it to 100% hydration. Even a small amount of dried starter can be reactivated.
How to Store Your Starter.
Giving your starter a lot of food is the secret to storing it short term when you need to go on a trip or need a baking break.
To freeze it: You can take some of your vigorous starter, place it in a bowl, add a small amount of water and then keep adding flour until you have a very stiff dough ball. Place the dough ball into a zip bag and place that into a plastic food storage container. Pop it into the freezer for 3-6 months. The yeast will die off after it’s in the freezer a few months so don’t leave it in too long.
To store in the fridge: Pour out most of your starter and then feed it a lot. Place it back in the fridge. It will last quite a while if fed a lot.
Alternately: Make a stiff dough (use only a small amount of starter and lots of flour/water). Keep it in a sealed container in the fridge. When you need to use it, take some out and feed it at the 100% ratio and use it as soon as it bubbles up.
Long term storage and back up. Take some of your vigorous fed starter and place it into a bowl. Add enough water to make the starter thin like a paint. Use a pastry brush and brush the starter over plastic wrap, which you’ve laid over a baking sheet. Allow it to dry overnight and once it’s completely dry, store it in a zip bag in a cool place (but not the fridge). A fridge has a lot of moisture and your dried sourdough might end up molding.
A sockie drawer or a cupboard where it isn’t humid would be fine. Even better, place the bag of dried starter into a mason jar or plastic food container( with a lid) to make sure to keep bugs and rodents out too.
A Dedicated Proofer
If you’re lucky enough to have a temperature controlled box/retarder that keeps a temperature between 46-48F/7-8C then you have a perfect place to keep your starter (and dough) that is optimum for keeping it healthy and encouraging great flavor. Below 50F/10C but above 40F/4C is ideal for starters long term health and storage.
Warming Your Starter
If your starter is sluggish and your kitchen is cool or you’ve kept your starter in the fridge, you might be tempted to warm it up by using your oven’s proofing mode or oven light. Most oven’s proofing modes are too hot for a sourdough starter and even just the light in the oven can be too warm. Use your thermometer to find out how warm your oven is with proofing mode or the oven light.
You might find that a closed oven with the light on is too warm, but an oven with the light on and the door propped open is a good temperature. I can’t tell you how often I’ve heard over the years how someone killed their starter by leaving it in the oven overnight with the light on.
There are many ways to warm your starter, giving it a fresh feeding with warm water, putting it into a closed microwave along with a hot cup of water, setting it on top of a warming pad, even setting the container into a bowl of warm water, but whatever method you use, make sure to test it with your thermometer to make sure it doesn’t get too hot.
Another way to store your starter is to share it with friends, family and neighbors. Then when you need a back up starter ask for some back!
The following book is available as a paperback book or as a free -e book download. It is a companion book to the video series above.

How to Make Your Own Sourdough Starter – the paperback book that goes along with the video series above.
This book is also available for free as an e-book download.
When your sourdough starter is mature, the next step is here: Sourdough Bread Baking 101
.
